Friday, May 21, 2021

Falling Into Place

I've been looking back a lot lately and accepting that I have come really far on this knitting journey.  πŸ˜€

It's hard to remember when knitting something new scared me, but it did and I conquered each one of those fears by knitting through them.

I've realized that all those dreams that I talked about for years have happened.  I am so blessed to be here and able to work on my dreams.  I do not take any of this for granted.

I am very, very grateful, to the Universe and my family and friends who have always supported me and cheered me on.  I am thankful to all my teachers and students who have always helped me to see another view and perspective in creating knitting, classes, and patterns.  I am thankful to you, dear reader, be you here today or in the future, may you be blessed by creativity and light.  Thank you for visiting my blog, it is a labor of love, sweat, tears, and discovery.

Woven through all these years is my journey to heal or at least make peace with my anxiety.  Most of the time my fears make no sense or have no bearing on what is actually going on, but I can't always see that.

I have so many patterns that are half done or just missing something because I think it gives me an excuse to validate that "not good enough" crap that my mental monologue goes through.

And...well, I am tired of it.  I have been firing back with a child's "why?" every chance I get and usually there is this vague feeling but no real truth.

I can get behind my fear of mouse droppings since they can actually be dangerous.  I can get behind my desire to have a safe environment with Covid out there still.  But I can't get behind my inner fear storytelling me I'm not good enough anymore or that I can't do something, because I can.  It may take work and I may not be amazing at it the first time but that is okay.  Everyone learns their craft or skill in a way that makes sense to them.

I talked for years about wanting a YouTube channel and now I have one.  I put out whatever I can't show in three pictures to help provide an alternate way to view what I am teaching in a tutorial or stitch pattern.   My video creation knowledge is still in a stage of infancy but I have learned so much and I am proud of what I have been able to share and create.   Do I still have a lot to learn, yes...but that is okay.  I am going to enjoy every part of the learning process.

I only talked for three weeks about wanting an Instagram account and I did the research and set it up and I feel that it has been so wonderful to have this connection with like-minded crafters and yarn creators.  Again, I am learning lingo and hashtags and such and it is fun.  I am enjoying the journey.

I'm done dreaming about the things that I could have done and I am starting to do them.  It took a while to get things set up but now I feel that I am in a good place to start going through my to-do list.

First on that list is to look at my Ravelry patterns which there are only a few because I have 60 in my computer here that need testing or knitting or something that should be in there...but I digress...

I want to reknit and rebrand each of those patterns.  I want to see if they need videos or I can hook them up to blog posts.  I want to spend a little time which each of them and then I can move on knowing that I have done my best with what I have out there.

One of Vixenpath's goals is to create patterns that have all the steps that a beginner might need to stair-step up to the level that the pattern is on.  A lot of times you see patterns on a rating system and I understand that is necessary for the formats that they are presented in.  These patterns might be missing steps that will help beginner knitters to partake in the pattern without going to YouTube and doing research.

I've read that this frustrates people and I know that I can't accommodate everyone but I do try to add as much information as I can to a pattern.  When I publish a pattern, I like to make it accessible to anyone that can knit and purl.  I agree that adding videos and tutorials to help fill in these gaps can be very helpful and I am working on that as well.  But in the end, my patterns are more like little tutorials and that could be because I started as a teacher. 

*steps on soapbox* 

But more so it came from hearing, "I can't make that because I am not good enough," and that hurts because everyone is good enough.  You may not have the skills yet but your worth does not come from a pattern or how well you knit.  You are worthy just by being the amazing being that is you.

*steps off soapbox*

I want to provide instructions to empower people to be able to enjoy the process of their knitting step by step.  If you can knit and purl you can knit linen stitch.  Linen stitch is simply moving the placement of the working yarn to the front or the back depending on the row combined with knits or purls,  and the end result is magical

So, I am starting with Frederick.

I've talked about Frederick before and it makes me think of Mom and Dad because they would read me Frederick and I just loved the whole idea of it.  Even now as an adult, envisioning this little mouse grabbing colors and things to say so that the mice have sustenance on a cold winter's day always touches a place in me deep down.

I was paging through my Instagram when I came upon a yarn that really grabbed me in Miss Babs's feed.  
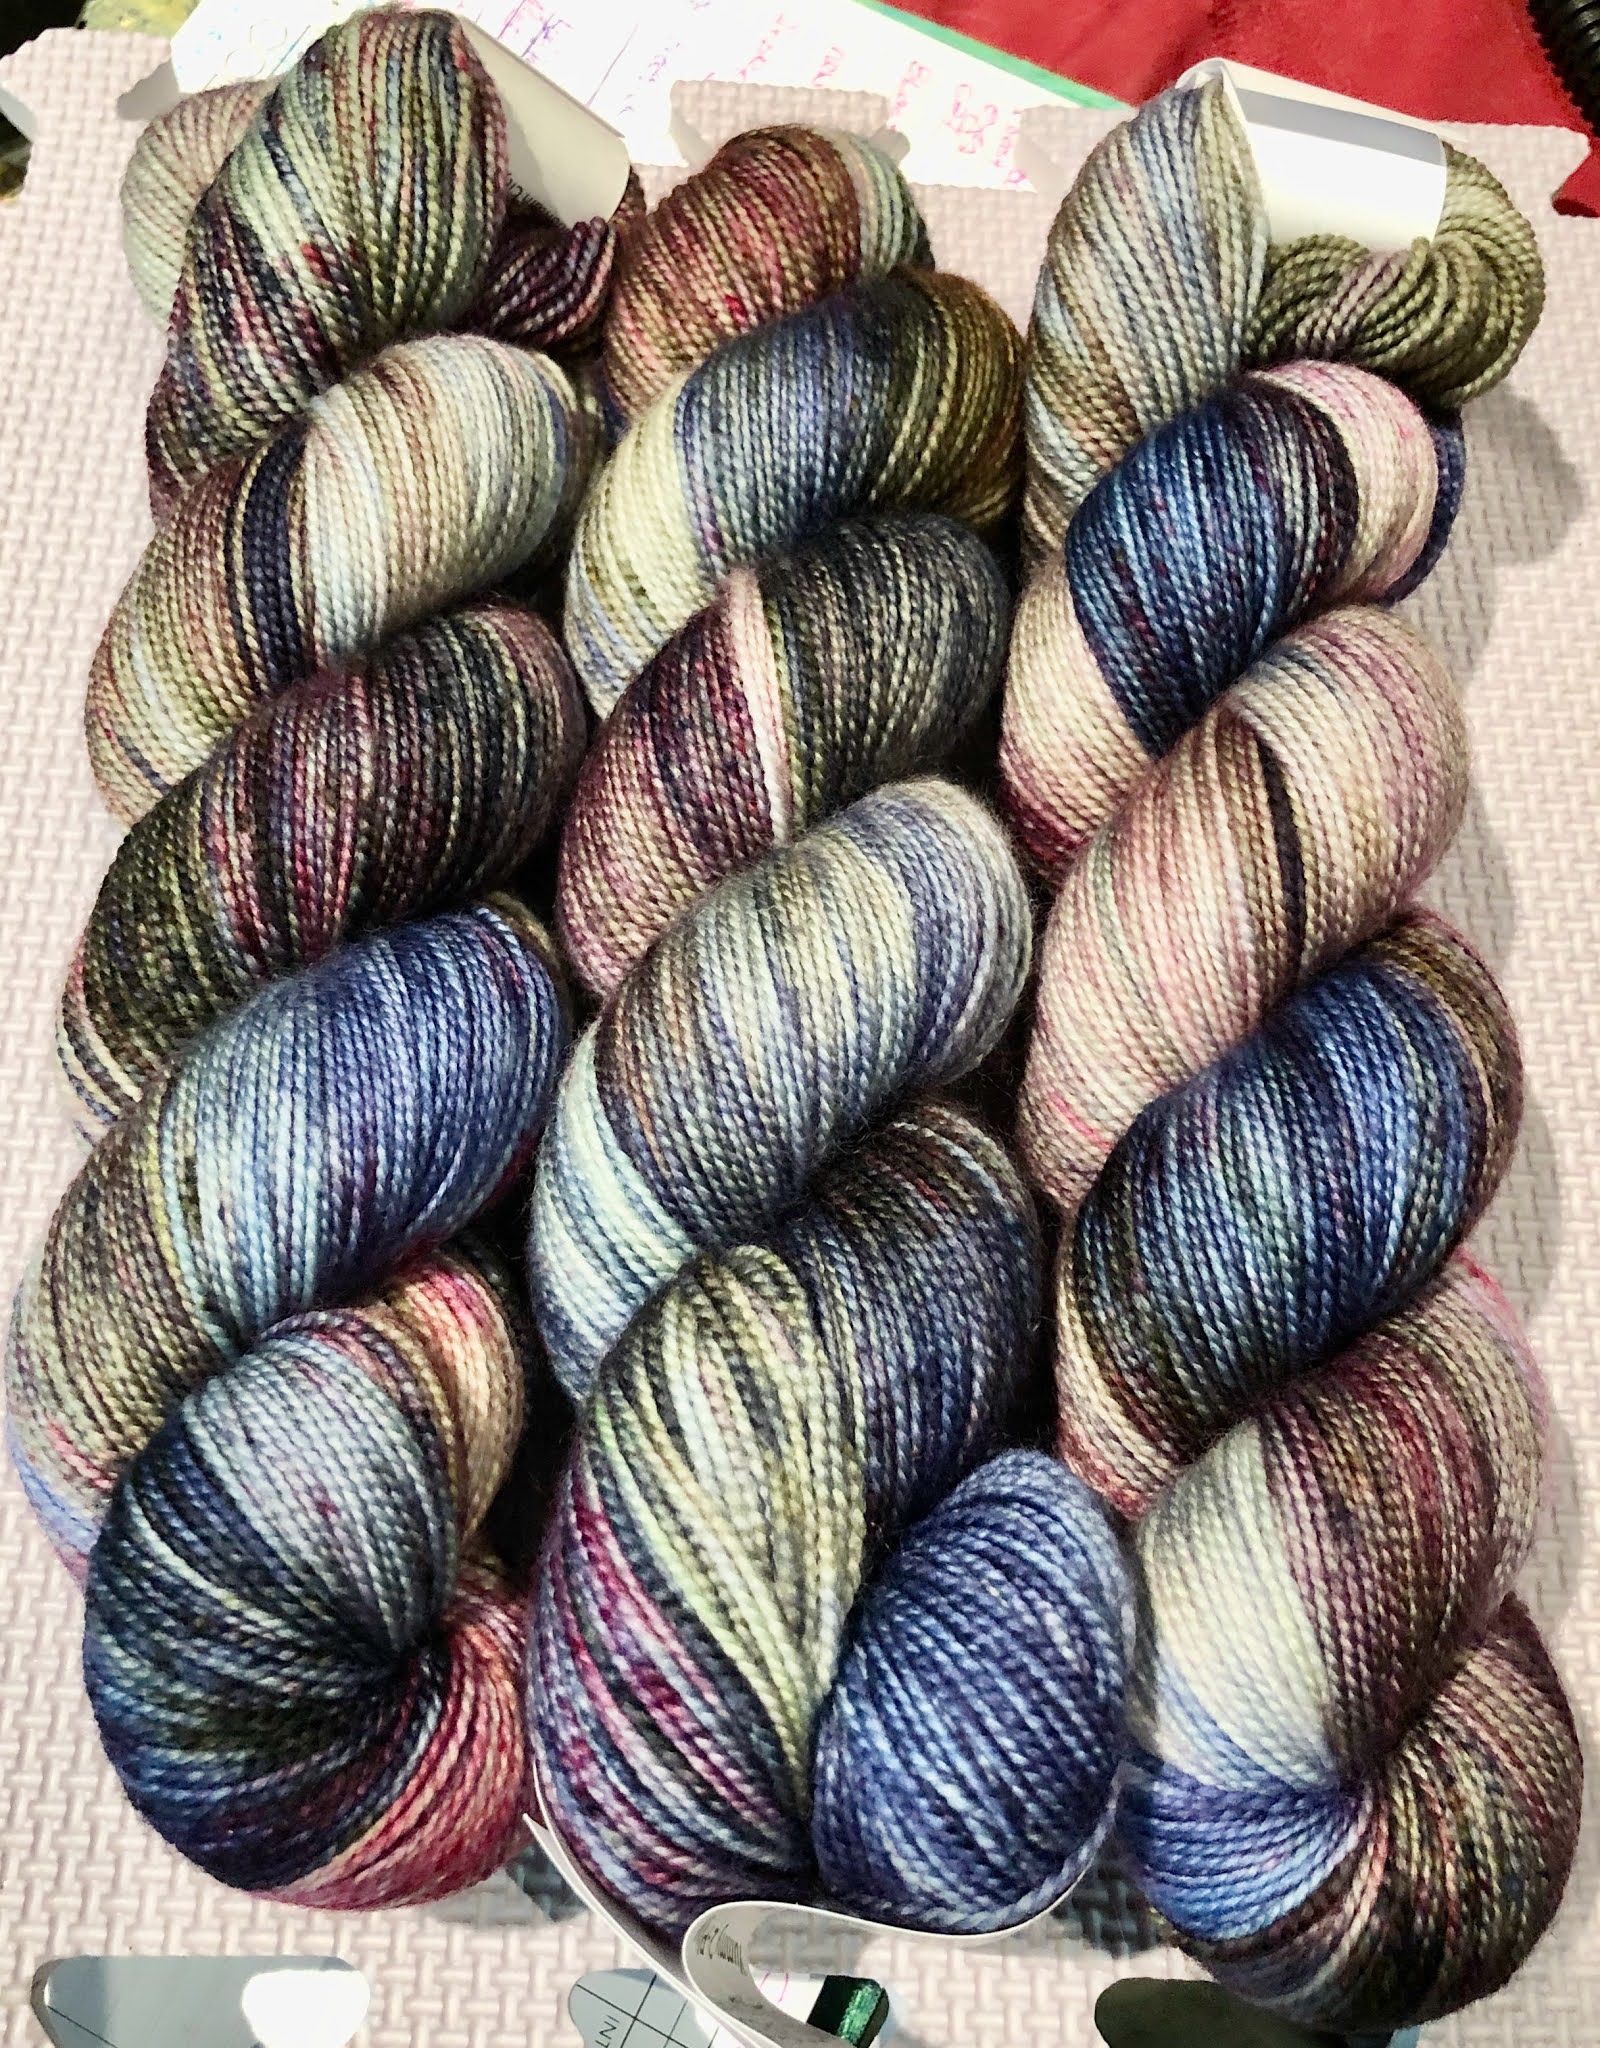

This beautiful yarn reminds me of English manicured gardens full of roses, hyacinths, and of course irises.  I immediately thought of Frederick and his colors and I knew that this was the moment that I would actually go back and edit anything that needed it, rebrand, and re-knit a new cover photo for my Ravelry patterns.

right side

wrong side

I am really excited to knit with this yarn.  It is so soft between my fingers and so very lovely to look at. 

Linen stitch has always fascinated me how it looks woven on one side and bumpy and beautiful on the other.  I made this pattern to showcase the beauty in yarn that appears when you use slip stitch patterns like this one.  This is about eight hours of work and I think the way the colorway is dancing through the stitches is gorgeous!

*************


My friend made another beautiful baby blanket and I had the pleasure to block it for her.  The yarn is Mandala by Lion Brand and it has such lovely pastel color changes.

*************

Happy crafting!
Ruinwen
πŸ˜€

**************************

Safe socially-distanced hugs  πŸ€—

**************************

Sending love and light to everyone being affected by this virus.  

May you be safe.  

May your loved ones be safe.  

πŸ™

**************************

Sending love and light to everyone facing discrimination, hate, prejudice, inequality, or racism.

πŸ™πŸ™πŸ’–πŸ’–πŸ™πŸ™

**************************

Vixenpath is a safe space.


If you are:


LGBTQ+

Black

Brown

Asian

Any race

Coming out

Anything.


I am a safe person and I will always hold space for you in love and light.


Monday, May 17, 2021

Panel II - Or How Designs Can Change in an Instant

So, when I swatched the angels I realized in my desire to see them knit that I put the cart before the horse and all that.  Designing a garment even one like this is full of...challenges.  Some are easy to overcome and others take so much math that my head begins to wonder if 2+2 still equals 4.

But this part is what I love most about designing, that challenge to make things work out and still look pretty.  I love a design that has a special element or tip and trick that makes the knitter say, "Hey, that's pretty clever."

But before all that cleverness can reveal itself the trial and error and the long hours of staring at numbers to make everything work has to be completed.

The problem started when I realized how the angels pulled the fabric in a wavy sort of direction and that nothing should come after them but something should come before them.  I realized this of course after I had finished the angel repeat and was all happy with myself.  But that is okay.  

look Ma, no needles :( ripping back

These undulations add interest in the way they changed the bias of my fabric and I wanted to accent that and add to the feeling that this shawl is energized with hugs.  Waves feel energetic to me and nothing is more wavy and full of little bubbles of energy than feather and fan (old shale).  This pattern allows a colorway to draw the eye and adds interest.

Feather and fan uses a formula.  Here is a common sample that needs 18 stitches for each section:

*K2tog 3 times, (YO, K1) 6 times, K2tog 3 times*, repeat ** across row

You could change up things a bit like this:

*K2tog 4 times, (YO, K1) 8 times, K2tog 4 times* repeat ** across row

or this:

*K2tog 5 times, (YO, K1) 10 times, K2tog 5 times* repeat ** across row

You get the idea...

We ended with 276 stitches in Panel I and that divided by 18 (a feather and fan repeat) does not divide evenly so this pattern does not work as is.

We need to increase the pattern by 18 stitches to end with a total of 294 stitches.  This minus the three stitches on each end is 288 which is divisible by 12, 18, 24, and 36.  This makes it a glorious starting point since all variations of how I might go forward are possible.

And at this point, my inner self told me to put off this pattern until I had worked it all out but then I couldn't figure it out with you.  I couldn't be authentic and show you that ideas need to be explored and design is like tweaking a recipe so that it works for you.  The first few times something may be a bit off, but add a dash of this and a tad of that, and voila!  Everything meshes together and works.

The first thing I do when I'm trying to suss stuff out is to chart it or write it out.  The second thing I do is knit it.  Sometimes these two methods are in perfect harmony and other times, the knitting looks nothing like the vision in my head.

For Panel, I will need more stitches...I will bop back in time and put a warning not to cut your yarn.  If you already have, I am sorry.  I did too.  If you did cut your yarn it is easy enough to add back in and secure using this method that I use a lot from Stephen West.

We will need to continue in pattern for 9 more rows to achieve our goal of 294 stitches.

I will write down the actual pattern below for panel II, this section is my thought process, trial, and error and swatching along the way.

Okay, so now we have 3, 288, 3 - this is what we wanted so now we can mark off the feather and fan.

I could break the feather and fan down in 18 stitch increments but that seemed like a lot of markers so I chose to put two repeats together for this pattern.  There will be 36 stitches maintained between the markers for the feather and fan pattern.

The first row of feather and fan is a knit row so it will be easy to add markers. 

Row 1:  K3, pm, YO,  K35 pm, *K36 pm* repeat ** until last 37 stitches, K35, YO pm, K3  - this will only be for this Row 1.

Row 2:  Knit all stitches

Row 3:  *K2tog 3 times, (YO, K1) 6 times, *K2tog 6 times, (YO, K1)  6 times), (YO, K1) 6 times K2tog 3 times *  repeat ** across row

Row 4: Purl all stitches

As I worked up the feather and fan I needed to keep in mind that the end result would have to be divisible by 24 and I came up with 360.  360 is divisible by 18, 24, and 36!  And there was much rejoicing!  😁 (These totals do not include those 6 side stitches)

yay!  YOs line up

The last factor in creating this pattern was to make the edge where we are doing all these increases to be pleasing to the eye.  that was solved by using a repeating formula that grew each time:

Row 7:   K3, YO, K1, (YO, K2tog) 2 times, K1

Row 11: K3, YO, K2, (YO, K2tog) 3 times, K2

Row 15: K3, YO, K3, (YO, K2tog) 4 times, K3

You get the idea.  We reverse this for the end side of the row and edging solved.

Whew!  After all that number-crunching and swatching I think it is time to begin panel II!

Thanks for holding space for me while I worked.  πŸ€—πŸ’–


Panel II Pattern:

Continue in pattern for 9 more rows with MC:  

Rows 1 - 8:  K3, YO, knit until last three stitches, YO, K3

Row 9 marker set up row:  K3, pm, YO,  K35 pm, *K36 pm* repeat ** until last 37 stitches, K35, YO pm, K3

294 stitches

On all rows that are knit or purled in the center, I didn't use "sm"(slip marker), because it seemed very distracting.

Change to CC or keep knitting in the MC, whatever you prefer.  You will need approximately 200 - 220 yards depending on how tight or loose you knit.

Row 1:  K3, YO, knit to last 3 stitches, YO, K3

Row 2:  K3, YO, K1, knit to last 4 stitches, K1, YO, K3

Row 3:  K3, YO, K2, sm, *K2tog 3 times, (YO, K1) 6 times, K2tog 6 times, (YO, K1)  6 times, K2tog 3 times, sm* repeat ** until last marker, K2, YO, K3

Row 4:  K3, YO, P3, purl to last six stitches, P3, YO, K3

Row 5:  K3, YO, K4, knit to last seven stitches, K4, YO, K3

Row 6:  K3, YO, K5, knit to last eight stitches, K5, YO, K3 

Row 7:  K3, YO, K1, (YO, K2tog) 2 times, K1, sm, *K2tog 3 times, (YO, K1) 6 times, K2tog 6 times, (YO, K1)  6 times, K2tog 3 times, sm* repeat ** until last marker, K1, (K2tog, YO) 2 times, K1, YO, K3

Row 8:  K3, YO, P7, purl to last 10 stitches, P7, YO, K3

Row 9:  K3, YO, K8, knit to last 11 stitches, K8, YO, K3

Row 10:  K3, YO, K9, knit to last 12 stitches, K9, YO, K3

Row 11:  K3, YO, K2, (YO, K2tog) 3 times, K2, sm, *K2tog 3 times, (YO, K1) 6 times, K2tog 6 times, (YO, K1)  6 times, K2tog 3 times, sm* repeat ** until last marker, K2, (K2tog, YO) 3 times, K2, YO, K3

Row 12:  K3, YO, P11, purl to last 14 stitches, P11, YO, K3

Row 13:  K3, YO, K12, knit to last 15 stitches, K12, YO, K3

Row 14:  K3, YO, K13, knit to last 16 stitches, K13, YO, K3

Row 15:  K3, YO, K3, (YO, K2tog) 4 times, K3, sm, *K2tog 3 times, (YO, K1) 6 times, K2tog 6 times, (YO, K1)  6 times, K2tog 3 times, sm* repeat ** until last marker, K3, (K2tog, YO) 4 times, K3, YO, K3

Row 16:  K3, YO, P15, purl to last 18 stitches, P15, YO, K3

Row 17:  K3, YO, K16, knit to last 19 stitches, K16, YO, K3

Row 18:  K3, YO, K17, knit to last 20 stitches, K17, YO, K3

On the next row, we will be creating a half repeat by adding in the 18 stitches from the edges on each side and placing new markers after the first three stitches and before the last 3 stitches.  

Row 19:  K3, YO, pm, K2tog 3 times, (YO, K1) 6 times, K2tog 3 times, sm, *K2tog 3 times, (YO, K1) 6 times, K2tog 6 times, (YO, K1)  6 times, K2tog 3 times, sm* repeat ** until last 21 stitches, K2tog 3 times, (YO, K1) 6 times, K2tog 3 times, pm, YO, K3

Row 20:  K3, YO, P1, purl to last 4 stitches, P1, YO, K3

Row 21:  K3, YO, K2, knit to last 5 stitches, K2, YO, K3

Row 22:  K3, YO, K3, knit to last 6 stitches, K3, YO, K3 

Row 23:  K3, YO, (K2tog YO, 2 times, sm, K2tog 3 times, (YO, K1) 6 times, K2tog 3 times, sm, *K2tog 3 times, (YO, K1) 6 times, K2tog 6 times, (YO, K1)  6 times, K2tog 3 times, sm* repeat ** until last 25 stitches, K2tog 3 times, (YO, K1) 6 times, K2tog 3 times, sm, (YO, K2tog) 2 times, YO, K3

Row 24:  K3, YO, P5, purl to last 8 stitches, P5, YO, K3

Row 25:  K3, YO, K6, knit to last 9 stitches, K6, YO, K3

Row 26:  K3, YO, K7, knit to last 10 stitches, K7, YO, K3

Row 27:  K3, YO, K1, (K2tog YO), 3 times, K1, sm, K2tog 3 times, (YO, K1) 6 times, K2tog 3 times, sm, *K2tog 3 times, (YO, K1) 6 times, K2tog 6 times, (YO, K1)  6 times, K2tog 3 times, sm* repeat ** until last 29 stitches, K2tog 3 times, (YO, K1) 6 times, K2tog 3 times, sm, K1, (YO, K2tog) 3 times, K1, YO, K3

Row 28:  K3, YO, P9, purl to last 12 stitches, P9, YO, K3

Row 29:  K3, YO, K10, knit to last 13 stitches, K10, YO, K3

Row 30:  K3, YO, K11, knit to last 14 stitches, K11, YO, K3

Row 31:  K3, YO, K2, (K2tog YO), 4 times, K2, sm, K2tog 3 times, (YO, K1) 6 times, K2tog 3 times, sm, *K2tog 3 times, (YO, K1) 6 times, K2tog 6 times, (YO, K1)  6 times, K2tog 3 times, sm* repeat ** until last 33 stitches, K2tog 3 times, (YO, K1) 6 times, K2tog 3 times, sm, K2, (YO, K2tog) 4 times, K2, YO, K3

Row 32:  K3, YO, P13, purl to last 16 stitches, P13, YO, K3

Row 33:  K3, YO, K14, knit to last 17 stitches, K14, YO, K3

Row 34:  K3, YO, K15, knit to last 18 stitches, K15, YO, K3

Row 35:  K3, YO, K3, (K2tog YO), 5 times, K3, sm, K2tog 3 times, (YO, K1) 6 times, K2tog 3 times, sm, *K2tog 3 times, (YO, K1) 6 times, K2tog 6 times, (YO, K1)  6 times, K2tog 3 times, sm* repeat ** until last 37 stitches, K2tog 3 times, (YO, K1) 6 times, K2tog 3 times, sm, K3, (YO, K2tog) 5 times, K3, YO, K3

Row 36: K3, YO, P17, purl to last 20 stitches, P17, YO, K3

You should have 366 stitches at this point.

Time to celebrate, Panel II is fini!

As always, if you have any questions please leave them in the comments and I will respond promptly.

Happy crafting!
Ruinwen
πŸ˜€

**************************

Safe socially-distanced hugs  πŸ€—

**************************

Sending love and light to everyone being affected by this virus.  

May you be safe.  

May your loved ones be safe.  

πŸ™

**************************

Sending love and light to everyone facing discrimination, hate, prejudice, inequality, or racism.

πŸ™πŸ™πŸ’–πŸ’–πŸ™πŸ™

**************************

Vixenpath is a safe space.


If you are:


LGBTQ+

Black

Brown

Asian

Any race

Coming out

Anything.


I am a safe person and I will always hold space for you in love and light.


Friday, May 07, 2021

WIPS [Work(s) In Progress]

 I never really thought of myself as a content creator until a few years ago when my sister mentioned it.  I just had a blog and wrote about life, some "to ponders" and my knitting.  But after that conversation I realized, well, yes I am a content creator.

Being a content creator is a wonderful job and love it.  I treasure my blog and the friends I made along the way.  It is a snippet of moments in my life and I refer back to it for dates when important things happened because they are usually recorded in its pages.

Lately, I have been really pushing the creative narrative, commissioned content (which I can't show), and projects (I can't show either).  This leaves me little time for personal projects and it makes me a bit sad.  I see them on the shelf in their little bags and I feel a pang of regret that I have abandoned them.

I am grateful for my design projects, I really am.  I love creating something new or figuring out a new way to do something.  I have tried during the pandemic to shift my knitting section to more tutorials to help inspire people who are looking for something new or some tips or tricks.  I have a lot of fun with those posts especially since they challenge me a bit with design or in filming which I have been doing a bit more of lately.

For a while now I have been working on a weekly schedule with Creative Tuesday. On Instagram that was taken so I use Creatrix Tuesday.  On Tuesday I sit down with my designs, colors, nature, art, music, and any other inspiration and just listen to my authentic voice.  This has been working really well for me and I have a slew of new ideas and directions to work with. 

On Friday I schedule a CEO day.  On this day I work on the business and attend to stuff on Ravelry and focus on design calls and what I am going to focus on for the next week.  It has really helped me to pinpoint my direction for Vixenpath.

During my last Friday session, I also talked with my sister who is full of good ideas and I added them to my minutes.  One of the things we talked about is that I need to address not having any time for my personal projects.

She suggested a Circle Back Week that would entail just working on all those projects that I have been neglecting.  This way, they have a time dedicated just to them and I can ease off designing for a week just to let my brain reset.

So, the first week of every month I will be showing you my Circle Back projects.  I don't want to overwhelm myself, so I will only focus on four projects at a time.  Two of them are from weekly knit-a-longs so only two of them will be neglected projects so don't worry about me taking on too much here.  lol

the edges are so clever

The first one is Rosy Blooms, by Steven West.  Yarn:  Expression Fiber Arts, Cherry Blossom.  Knit Picks, Stroll Glimmer Black (I think neither of these yarns exists anymore 😭) Expression Fiber Arts dyes in lots, and then they are gone, but she is always creating beautiful new themed stuff. 

I am knitting on this with a friend, though we took a little break on it to do some other things lately.

 stockinette next to the dropped stitches for contrast

The second is Clapotis, by Kate Gilbert.  Yarn:  Knitpicks, Chroma, Manzanita.  This color is not available but chroma has some lovely colorways.

I am knitting on this with a friend and we are almost to the decrease section.  Loving this yarn and pattern together!

love all this color!

The third one is a feather and fan blanket with some homeless Red Heart yarn in the colorway Favorite Stripe.  I am on my third skein out of five and I am loving the burst of color in this blanket.  I plan on using it for meditation and chakra work.

beautiful optical illusion as the colors blend

The final project for this Circle Back week has been this Gingham, crocheted blanket from Daisy Farm Crafts.  If you crochet, please check her out, she has some beautiful and innovative patterns with web and YouTube tutorials.  Yarn:  Carron Simply Soft, blue, white, and country blue.

I love this pattern, the whole idea of it, and how it looks as the yarns blends together.

So here is the hard part for me.  These projects will be my four Circle Back personal projects each month until one is completed.  Only then can I begin or work on finishing something new.   This is my transparent accountability promise to you all and especially to myself.  

You are more than welcome to join me in giving some attention to your personal projects.  I'd love to hear what you are working on!

*************

To all you Mothers of children, animals, or people you watch over, have a Blessed, Beautiful, and Happy Mother's Day!  πŸ€—πŸ’–

*************

Happy crafting!
Ruinwen
πŸ˜€

**************************

Safe socially-distanced hugs  πŸ€—

**************************

Sending love and light to everyone being affected by this virus.  

May you be safe.  

May your loved ones be safe.  

πŸ™

**************************

Sending love and light to everyone facing discrimination, hate, prejudice, inequality, or racism.

πŸ™πŸ™πŸ’–πŸ’–πŸ™πŸ™

**************************

Vixenpath is a safe space.


If you are:


LGBTQ+

Black

Brown

Asian

Any race

Coming out

Anything.


I am a safe person and I will always hold space for you in love and light.


Friday, April 30, 2021

Hugs

During this time of quarantine, the thing I have missed the most is hugs.  I am from an Italian family that always hugs.  It is part of who I am.  I sign my posts with hugs and my e-mails with hugs.  Hugs are really important to me.

So, it only seemed right that I design a little hug from me to you.

This one is made out of sock yarn.  You could even use scraps of leftovers if you want to for one of your colors.  You can use variegated yarn or solid colors.

I used three colorways for mine.  

There are three stages of this shawlette:

The first panel is to induce a state of Zen.  While some may find repetitive tasks boring, knitters usually find them relaxing.  A simple repeat over and over lets you chill and watch a movie, some videos or, listen to a podcast.  You don't worry about messing up because you've got this memorized and even if there are rows and rows of repetitions it feels good to have this kind of knitting once and a while.

The lace panel, which we will explore next week is a stitch that looks like people or angles holding hands to me.  I love lace and wanted something friendly.  This pattern has a few really cool elements to it that are not so common in knitting.  I think it will be a lot of fun.

The last section of this 3-part series will be to make an edging that is fun.  I haven't figured out what this is yet.  I keep hearing to trust in my process, so I am.  I have a  bunch of ideas and a lot of swatching to do.  lol

I give you Hugs Part I πŸ€—

Yarn

Panel 1 is about 300 - 400 yards of sock weight on size 5 needles

Panel 1


CO 144 stitches in any manner you like with color A, I used the cable cast on to give it some stretch.  I just made a little video here last week on this technique if you are unfamiliar with it.

***This shawlette can be made bigger if you choose.  CO any multiple of 24 + 12***

For 66 rows: K3, YO, knit to the last three stitches, YO, K3

(This is Ruinwen from the future - do not cut your tail - we will be continuing these rows a bit in the next Panel.)

When this section is complete you will have 33 garter ridges and added 132 stitches.  You will now have a total of 276 stitches on your needles.

That's it, relaxing garter for rows upon rows.  I love to have a project like this on days when I want to knit but I don't want to count stitches or repeats.

Garter stitch is the first stitch that we learn and it is always comforting to go back to.  It is akin to our favorite comfort food and always brings a sense of calmness. 

My hope is that this stitch will allow you to relax a little. As the skein unwinds let go of a little bit of stress or worry.  Take a deep breath and release it as you release all that tension in your neck and shoulders.  Let each stitch lull you into a sense of peace and serenity. 

Bright Blessings!
πŸ™☯𑁍♰✡☆㊪πŸ’–
****************
My friend was making the mesh scarf and didn't like the way the edge worked so I rewrote it to add another stitch to the opposite edge.  Even the simplest patterns always have something to teach me.  

Here is the link.

Cast on an odd amount (changes are in blue)

Row 1: K2,*YO, K2tog* repeat * * to last stitch, K1
Row 2: K2, purl to the last stitch, K2
🧢 

************************

In two weeks we will work on Panel II of our Hug.  I wanted to give everyone enough time to knit the section before proceeding.

Thanks for reading!

If you have any questions regarding this or any of my other tutorials, please feel free to leave a question in the comments.

Happy crafting!
Ruinwen
πŸ˜€

**************************

Safe socially-distanced hugs  πŸ€—

**************************

Sending love and light to everyone being affected by this virus.  

May you be safe.  

May your loved ones be safe.  

πŸ™

**************************

Sending love and light to everyone facing discrimination, hate, prejudice, inequality, or racism.

πŸ™πŸ™πŸ’–πŸ’–πŸ™πŸ™

**************************

Vixenpath is a safe space.


If you are:


LGBTQ+

Black

Brown

Asian

Any race

Coming out

Anything.


I am a safe person and I will always hold space for you in love and light.


Friday, April 23, 2021

Charlotte

In December of 2013, I had a posterior vitreous detachment.  A floater joined my right eye and I named her Iris.

Last week I had a PVD in my left eye and a new floater has joined my field of vision and I have named her Charlotte.  It was the name that came to me as my eyes were numbing and dilating and I think it is a beautiful name.

Once again the Doc said that everything looks good I just have a new floater which is bigger than Iris and I say, that is great!  Praise the Goddess!

I happily welcome in a new floater friend.  They teach me how to slow down when I have worked too many hours on bright screens.

So I have been knitting more and taking more breaks.  When my eyes were super dilated I started working with this rainbow yarn and thankfully I can knit feather and fan (old shale) practically in my sleep.

My friend gave me this beautiful homeless yarn that a friend gave her.  I love rainbows and color and working a few repeats of this simple pattern has given me such great joy.

*************

One of the things that I got back to during the pandemic was making herbal blends.  It has been hard to find blends that don't add one of the foods that I am allergic or sensitive to.  This led me to a trial and error with the family and I am happy to say that I worked up a new spice blend which I want to share with you all.

Herbal Steak Seasoning (though it works for chicken, hamburger, venison...)

3 tsp black pepper

2 tsp salt

1 tbsp garlic powder

2 tbsp onion powder (or grind up dried minced onions)

2 tbsps of each: oregano, rosemary, and thyme (Can you tell I'm Italian?)

1 tbsp smoked paprika (my secret ingredient)

1 tbsp smoked chipotle

I grind the whole kit and caboodle until it is really fine using a mortar and pestle.

I have tried it with a bunch of meats (including venison) and it really lends itself to waken up the flavors.  

When our CSA has herbs I get them and then dry them so that I can use fresh spices as much as possible.  Sometimes our grocery store has fresh herbs too and we will buy those so I can dry them.  I love when the house smells like rosemary or thyme (my favorites) when they are drying.

Let me know if you try it and what you think.

**************************

Safe socially-distanced hugs  πŸ€—


**************************

Sending love and light to everyone being affected by this virus.  

May you be safe.  

May your loved ones be safe.  

πŸ™

**************************

Sending love and light to everyone facing discrimination, hate, prejudice, inequality, or racism.

πŸ™πŸ™πŸ’–πŸ’–πŸ™πŸ™

**************************

Vixenpath is a safe space.


If you are:


LGBTQ+

Black

Brown

Asian

Any race

Coming out

Anything.


I am a safe person and I will always hold space for you in love and light.

Friday, April 16, 2021

Beginnings

I love this time of year as the earth wakes up from Her slumber and slowly colors the landscape in greenery and floral decorations.

This tree is a new visitor to our little slice of heaven.  She deviated from her dictated area and grew on our side of the fence and I feel blessed to have her here.  I get to view the blooming and new growth as I wash the dishes and that really makes me happy.

remembering my childhood home

Growing up we were blessed with beautiful pink cherry trees that lined our streets with the majesty of the sakura.  There is a reason that we were gifted so many of these magical trees to adorn the tidal basin; they bring joy and invite in beauty.  After the coldness of winter, these amazing blooms usher in hope, laughter, and joy.

So, having a kinda cousin to those memories is really a special blessing for me.

Speaking of beginnings...

I had a new knitter ask about some tips and tricks that would help a beginner.

So here are some things that I wish I had known when I started knitting that I try and always share with my students.

Casting On

Usually, the way you learn to cast on is how your first teacher taught you.  My Mom was my teacher and she taught me a way to cast on that I rarely see anyone do so I always have three ways to share with students so they can pick the one that resonates with them the most.

The cast-on sets the base for the fabric, it is your first row and the framework for all the stitches to come.  

Some fabrics need more give and others can make do with whatever you throw at them.  Anything drapey like lace will need more give from the cast on.

The three cast-on methods that I usually teach are.

  • The long tail
  • The cable
  • The crochet
The following videos were made with my new tripod/gimble and I am still getting used to working in mid-air to film.  Sorry if they are a little wonky!

The Long Tail

This is a stretchy kind of cast-on that is perfect for beginning projects like scarves.

The downside to this cast-on is that you never know how much of a tail to have.  This can be mitigated by wrapping the yarn around the needle for the number of stitches you have.  This will be close to the amount of yarn you will need to cast on with.

I have seen it done many ways but I still cast on the way my Mom taught me all those years ago.

The Cable

The cable cast-on is my go-to cast-on for most things because it is very stretchy.  I also like the fact that you cast on from your tail end on so you don't have to worry about the tail like you do in the long tail.

The Crochet

This is a great way for crocheters to take a leap into their first knitting projects, it is also a fabulous cast on and has a decent stretch.

Crochet is a sibling yarn craft to knitting and can be vital to fixing dropped stitches, can be creative and fun as it adds embellishments and edgings (I πŸ’– picot) and as I have mentioned here, it can be used to start a beautiful foundation to your fabric.

The First Row

There are a bunch of things that one has to keep in mind when knitting their first row and this is only a small sampling of possibilities:

  • tension
  • yarn placement
  • extra stitches and/or holes
  • marking sides
  • lifeline (you won't need this on the first row but it is good to know about)

Tension

the circle shows where I abandoned tension all together
in my first double knitting piece from 2008

Tension is the amount of snugness that you have to put onto each stitch to keep them all uniform.  If you pull too tightly it will evident in your stitches.  If you knit loose then your stitches will follow suit.  I have seen all types of knitters.  I saw someone knit so tightly they broke a bamboo needle and I witnessed someone knit so loosely her stitches would fall off the needle all the time.

But that is okay.  Good tension comes with time and practice.  You talk to most of the people who are knitting their first scarf and they will have relaxed towards the end and found their stride, the tension of the fabric will reflect this.

Your first project is a badge of pride it shows how much you have improved and become one with your craft.

Yarn Placement

The working yarn is a very important component in knitting.  When you knit the working yarn is usually in the back and when you purl, the working yarn is usually in the front.  

When you are going back and forth between the two like we talked about last time when making ribbing, you have to move the yarn with your stitches otherwise you can get unintentional holes in your fabric.

Extra Stitches and/or Holes

Holes - So we have already talked about holes in your fabric from holding the yarn in front when making a knit stitch.  If it only happens once and a while you can just drop the yarn over (this is what an intentional hole is called) off of the needle and the fabric will absorb the extra yarn.

Another way I have seen extra stitches form is from the first stitch of the row as shown above.  You can see how the first two stitches look different from the stitches next to them.  This is because this first stitch has the working yarn pulled backward which then creates what looks like two stitches.

Extra Stitches - Instead of ripping out your row if you find an extra stitch, you can just knit two stitches together somewhere in the center of the row and you will be back to your cast on number.

When your amount is in doubt, the knit two together decrease can save a lot of grief.

Marker on the Right Side

Knowing the right side of knitting from the wrong side of your work can be really important at times.  If both sides are knit this is not a real problem because both sides are identical.  Later on, though this little trick can be super helpful.  Place a marker on the right side of your work so that you always know which side is the right side.

Later on, you will learn to read your knitting and this won't be so necessary unless you are working on something that looks similar on both sides, yet each side is different like two-color brioche or double knitting.  Sometimes I just find myself forgetting the simplest things and this trick has saved me more than once.

One of my knitting friends let me know today that this trick really helped her and reinforced it being on my list.

Lifelines


This is an example of a lifeline.  Like the name implies, this method of proactive knitting helps to keep your rows intact; like the “save” function in a program.  A lifeline is made when you use a blunt tapestry needle to carefully thread a piece of yarn that contrasts with your knitting, through the centers of the stitches as they present themselves on the needle.  

Note: avoid going through any markers or splitting any stitches when you do this.  


 a lifeline adapts to your fabric

Then, should the need arise, you can remove your needles from your knitting at any time and rip back to that line, reload your stitches back onto the needle, and start knitting again.


Lifelines can provide an added sense of security when knitting, giving you a safe place to go back to.  They can be added and moved as new rows are correctly completed.  They can also let you try to add mods to a pattern that isn’t working without losing your work.


The only drawback is you must use them before you need them.  Some feel that they take too much time and effort, but in my experience, even as a more advanced knitter, I find the time to put them in is more than worth it when it spares me hours of re-knitting a project.


Bright blessings and happy crafting!


**************

If you have any questions or comments on this or any of my other tutorials, please leave me a comment.

****************************

Safe socially-distanced hugs  πŸ€—


****************************
Sending love and light to everyone being affected by this virus.  

May you be safe.  

May your loved ones be safe.  

πŸ™

***************************

Sending love and light to everyone facing discrimination, hate, prejudice, inequality, or racism.
πŸ™πŸ™πŸ’–πŸ’–πŸ™πŸ™